Android中使用protobuf
Protocol Buffers
Google公司开发的一种数据描述语言,类似于XML能够将结构化数据序列化,可用于数据存储、通信协议等方面。同XML相比,Protocol buffers在序列化结构化数据方面有许多优点(google官方提出):
• 更简单
• 数据描述文件只需原来的1/10至1/3
• 解析速度是原来的20倍至100倍
• 减少了二义性
• 生成了更容易在编程中使用的数据访问类
08年7月8号将其作为开源项目对外公布。
官方主页地址:https://developers.google.cn/protocol-buffers/
官方开源地址:https://github.com/google/protobuf
相关jar的maven:http://mvnrepository.com/artifact/com.google.protobuf
一.protobuf-java-[version].jar和protoc.exe
http://central.maven.org/maven2/com/google/protobuf/protobuf-java/3.1.0/protobuf-java-3.1.0.jar
https://github.com/google/protobuf/releases/download/v3.1.0/protoc-3.1.0-win32.zip\bin\protoc.exe
注意,本文使用的是3.x 。
使用maven打包protobuf的jar(http://www.cnblogs.com/superbi/p/4368240.html)
0.安装并配置好JDK,安装并配置好maven。
1.从github下载并解压protobuf-xx.xx.xx.zip,并把protoc-xx.xx.xx-win32.zip中的proto.exe放到protobuf-xx.xx.xx.zip解压文件夹中的src目录,如(D:\protobuf-2.6.1\src)
2.打开cmd,并进入protobuf的解压中的java目录,如(D:\protobuf-2.6.1\java),运行mvn package或者mvn install,运行此命令需要internet(联网)的支持
3.编译停止后在cmd窗口中看到build success时,恭喜你,jar生成了,jar文件在protobuf下java中的target目录,如(D:\protobuf-2.6.1\java\target)
二.定义数据结构
首先同java类,创建Persion.proto文件(建议文件名和代码中message标识的类名不一样)。
2.x版本代码:
|
1 2 3 4 5 6 7 8 9 10 11 12 |
message Person{ required string name = 1; //必需的、String类型的属性“name”,此属性唯一标识是“1” required int32 id = 2; //必需的、int类型的属性“id”,此属性唯一标识是“2” optional string email = 3; //可选的、String类型的属性“email”,此属性唯一标识是“3” // 唯一标识不是必须连续的 } // required 必需:必须提供字段的值,否则消息将被视为“未初始化”。尝试构建未初始化的消息将抛出一个RuntimeException。解析未初始化的消息将抛出IOException。除此之外,必需字段的行为与可选字段完全相同。 // optional 可选:字段可以设置也可以不设置。如果未设置可选字段值,则使用默认值。对于简单类型,您可以指定自己的默认值,就像我们对示例中的电话号码类型所做的那样。否则,使用系统默认值:数字类型为零,字符串为空字符串,bools为false。对于嵌入式的消息,默认值始终是“默认实例”或邮件,其中有没有其字段设置的“原型”。调用访问器以获取未显式设置的可选(或必需)字段的值始终返回该字段的默认值。 // repeated 重复:字段可以重复任意次数(包括零)。重复值的顺序将保留在协议缓冲区中。将重复字段视为动态大小的数组。 |
3.x版本代码:
|
1 2 3 4 5 6 7 8 9 10 |
syntax = "proto3"; // 不指定,默认是proto2 message Person{ string name = 1; // String类型的属性“name”,此属性唯一标识是“1” int32 id = 2; // int类型的属性“id”,此属性唯一标识是“2” string email = 3; // String类型的属性“email”,此属性唯一标识是“3” // proto3中修饰符是不可显示指定的,因为默认都是optional } |
syntax = "proto3"一句是转换为java代码时的建议设置,不指定会给出警告。
如果syntax = "proto2",修饰符要显示的指定,否则别指定。
“message”如果java的关键字“class”。“Persion”就同java中的类名。大括号内就和声明一个javabean一样了。
修饰符原文说明:
https://developers.google.cn/protocol-buffers/docs/javatutorial
• required: a value for the field must be provided, otherwise the message will be considered "uninitialized". Trying to build an uninitialized message will throw a RuntimeException. Parsing an uninitialized message will throw an IOException. Other than this, a required field behaves exactly like an optional field.
• optional: the field may or may not be set. If an optional field value isn't set, a default value is used. For simple types, you can specify your own default value, as we've done for the phone number type in the example. Otherwise, a system default is used: zero for numeric types, the empty string for strings, false for bools. For embedded messages, the default value is always the "default instance" or "prototype" of the message, which has none of its fields set. Calling the accessor to get the value of an optional (or required) field which has not been explicitly set always returns that field's default value.
• repeated: the field may be repeated any number of times (including zero). The order of the repeated values will be preserved in the protocol buffer. Think of repeated fields as dynamically sized arrays.
• Required Is Forever You should be very careful about marking fields as required. If at some point you wish to stop writing or sending a required field, it will be problematic to change the field to an optional field – old readers will consider messages without this field to be incomplete and may reject or drop them unintentionally. You should consider writing application-specific custom validation routines for your buffers instead. Some engineers at Google have come to the conclusion that using required does more harm than good; they prefer to use only optional and repeated. However, this view is not universal.
数据类型原文说明:
https://developers.google.cn/protocol-buffers/docs/proto3#scalar
|
1 2 3 4 5 6 7 8 9 10 11 12 13 14 15 16 17 18 19 |
ptoto类型 java类型 double double float float int32 int int64 long uint32 int[注] uint64 long[注] sint32 int sint64 long fixed32 int[注] fixed64 long[注] sfixed32 int sfixed64 long bool boolean string String bytes ByteString [注]在Java中,无符号的32位和64位整数使用它们的有符号对数来表示,顶部位只存储在符号位中。 |
属性的默认值:
https://developers.google.cn/protocol-buffers/docs/proto3#default
• For strings, the default value is the empty string.
• For bytes, the default value is empty bytes.
• For bools, the default value is false.
• For numeric types, the default value is zero.
• For enums, the default value is the first defined enum value, which must be 0.
• For message fields, the field is not set. Its exact value is language-dependent. See the generated code guide for details.
对于字符串,默认值为空字符串。
对于字节,默认值为空字节。
对于bools,默认值为false。
对于数字类型,默认值为零。
对于枚举,默认值为第一个定义的枚举值,它必须为0。
对于消息字段,未设置字段。 它的确切值是语言相关的。 有关详细信息,请参阅生成的代码指南。
常用配置
1)包和类名
Person1.proto文件
|
1 2 3 4 5 6 7 8 9 10 11 12 13 14 15 16 17 18 |
syntax = "proto3"; // package demoabc; // 此源文件所在的包,建议不指定 // option:可赋值非必须赋值 // java_package:目标文件的java包名 option java_package = "cuiweiyou.protobufdemo"; // 目标文件中的java类名 option java_outer_classname = "PersionTest"; message Person1{ string name = 1; int32 id = 2; string email = 3; } |
2)属性的嵌套
Person2.proto文件
|
1 2 3 4 5 6 7 8 9 10 11 12 13 14 15 16 17 18 19 20 21 22 23 24 25 26 27 28 29 |
syntax="proto3"; option java_package="cuiweiyou.protobufdemo"; option java_outer_classname="Persion"; message Person2{ // 枚举 声明国籍 enum Country { China=0; // 第一个的唯一标识必须是0 USA=1; France=2; } // 内部类 声明职业 message Profession { string name = 1; string company = 2; } Country country = 5; // 定义国籍属性,唯一标识1。并非指定了此属性为“USA”,实际默认是0-“China” Profession prof = 4; // 定义职业属性 string name=6; string email=1; int32 id=2; } |
3)引用
Person3.proto文件
|
1 2 3 4 5 6 7 8 9 10 11 12 |
syntax="proto3"; option java_package="cuiweiyou.protobufdemo"; option java_outer_classname="Persion"; import "Persion2.proto"; // 导入类。同java,可导入多个 message Person3{ Person2 child = 1; // 声明指定类数据类型的属性 } |
三.生成Java类
通用代码
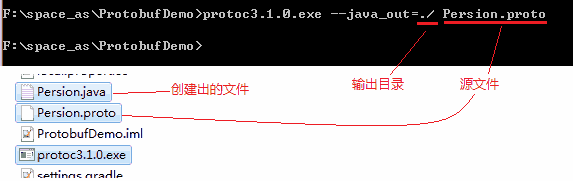
使用前面准备好的protoc.exe,在cmd命令行运行:
protoc.exe --java_out=输出目录 源文件
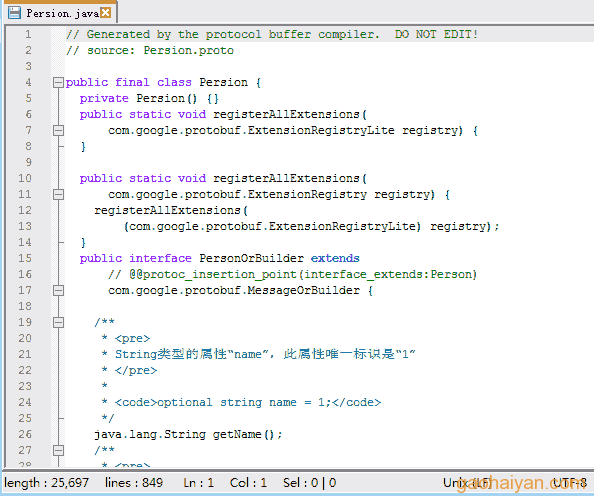
指定了包和类名的Persion1.proto文件生成的java类:

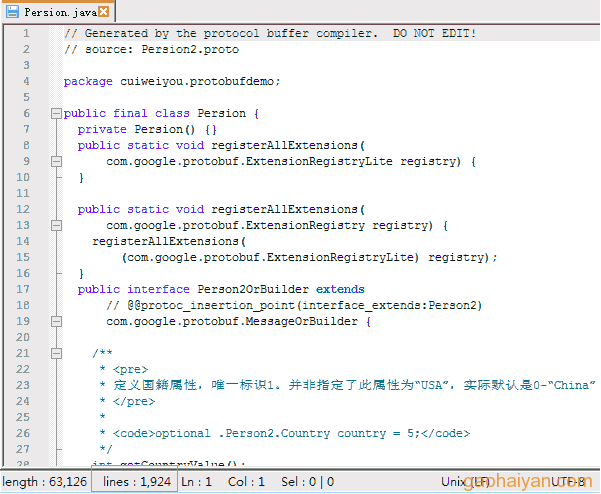
嵌套属性的Persion2.proto文件生成的java类:
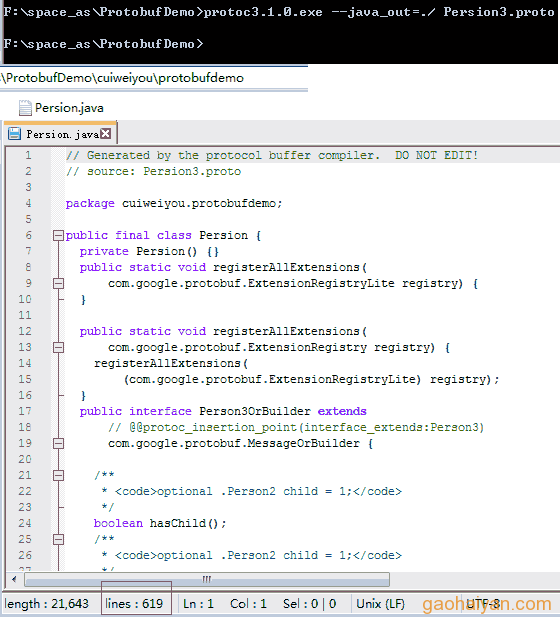
引用其他proto的Persion3.proto文件生成的java类:
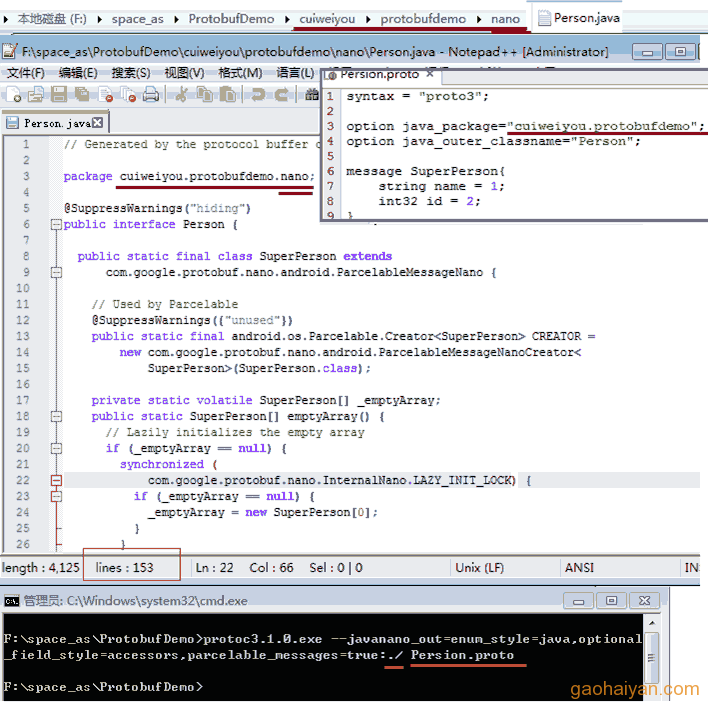
针对Android生成代码
http://www.jianshu.com/p/185fc0e13028
|
1 2 3 4 5 6 7 8 |
protoc3.1.0.exe --javanano_out=enum_style=java, optional_field_style=accessors, parcelable_messages=true: 目标路径 源文件 |
编译选项,选项之间用逗号隔开(大括号中的为可选值):
• optional_field_style={default, accessors, reftypes},定义每个字段所生成的代码的格式:
• default:proto中每个字段生成一个public的可变的值;
• accessors:proto中每个optional字段会封装成一个private的值和4个用于操作该值的方法,分别是get
要注意的是,当启用accessors选项时,使用Proguard混淆时,一定禁用-dontoptimize选项和启用-allowaccessmodification选项,这能够在项目编译时去掉那些没被调用的方法,减少最终的代码量;
• reftypes:proto中每个字段都会生成一个public的可变的值,与default不同的是,对于每个基本数据类型,如int,float等,都会使用Java对应的内建类型,并初始化为null(比如int会使用Java.lang.Integer类来替代),这样会带来额外的开销,好处是你可以避免歧义,比如optional int的字段,收到为0的值时,会分不清到底传来的值是0,还是这个字段为空
• enum_style={c, java} (default: c),定义枚举的格式,使用java style。
• ignore_services={true,false} (default: false),Protobuf Nano不支持services,如果在proto文件中定义了services,会导致编译错误,将该选项置为true,在编译时会忽略services相关的内容。
• parcelable_messages={true,false} (default: false),这个选项很重要,在android中,Parcelable是序列化对象的接口,很多数据交换都要应用到这个接口,比如Intent,和进程间通信。开启该选项,Protobuf Nano所生成的Java对象都会自动实现Parcelable接口,Intent和进程间通信就能直接使用这些对象。
可以将生成的java文件放到理想包里,然后将文件代码的package改为实际的包。
建议将parcelable_messages设为false,因为3.1.0版的nano jar中没有提供此类。也许是3.x版本比2.x牛逼很多,已经不需要通过ParcelableMessageNano类进行序列化。
四.在Android中使用
1.protobuf-javanano
•在MyEclipse和Android Studio中引入protobuf。
方式1,使用上面链接给出的jar。
方式2,AS通过gradle引入:
|
1 2 3 |
compile group: 'com.google.protobuf.nano', name: 'protobuf-javanano', version: '3.1.0' |
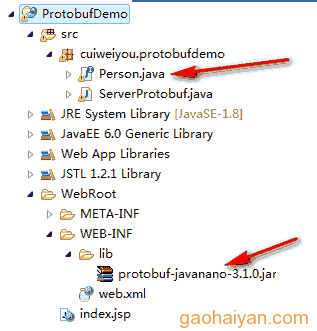
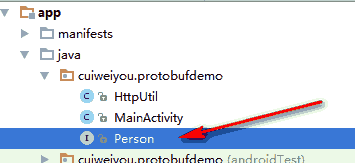
•将之前生成的Persion.java或Person.java引入。这里先引入Person.java瞧瞧安卓版本的用法。

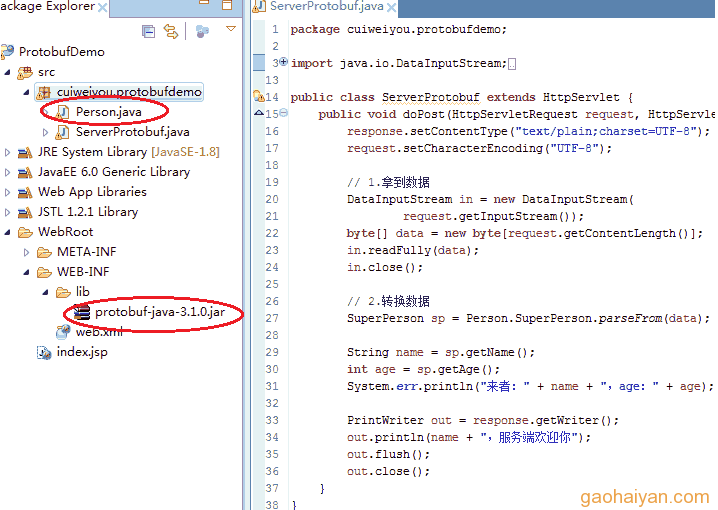
1)服务端
首先定义一个Servlet,
|
1 2 3 4 5 6 7 8 9 10 11 12 13 14 15 16 17 18 19 20 21 22 23 24 25 26 |
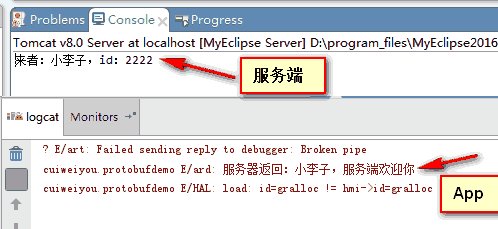
public class ServerProtobuf extends HttpServlet { public void doPost(HttpServletRequest request, HttpServletResponse response) throws ServletException, IOException { response.setContentType("text/plain;charset=UTF-8"); request.setCharacterEncoding("UTF-8"); // 1.拿到数据 DataInputStream in = new DataInputStream(request.getInputStream()); byte[] data = new byte[request.getContentLength()]; in.readFully(data); in.close(); // 2.转换数据 SuperPerson sp = Person.SuperPerson.parseFrom(data); String name = sp.getName(); int id = sp.getId(); System.err.println("来者:" + name + ",id:" + id); PrintWriter out = response.getWriter(); out.println(name + ",服务端欢迎你"); out.flush(); out.close(); } } |
然后将Servlet注册到web.xml。最后其它服务。
|
1 2 3 4 5 6 7 8 9 10 11 |
<servlet> <servlet-name>ServerProtobuf</servlet-name> <servlet-class>cuiweiyou.protobufdemo.ServerProtobuf</servlet-class> </servlet> <servlet-mapping> <servlet-name>ServerProtobuf</servlet-name> <url-pattern>/HelloProtobuf</url-pattern> </servlet-mapping> |
2)App端
网络请求使用post方式,
|
1 2 3 4 5 6 7 8 9 10 11 12 13 14 15 16 17 18 19 20 21 22 23 24 25 26 27 28 29 30 31 32 33 34 35 36 37 38 39 40 41 42 43 44 45 46 47 48 49 50 51 52 53 54 55 56 |
/** 网络请求工具 * @author:崔维友 * @version:1.0.0 * @created:2017/01/009,17/1/9 */ public class HttpUtil { private HttpUtil() {} /** @throws IOException * @throws MalformedURLException */ public static String post(String url, byte[] args) throws MalformedURLException, ConnectException, IOException { String result = null; HttpURLConnection conn = (HttpURLConnection) new URL(url).openConnection(); conn.setRequestProperty("Connection", "Keep-Alive");// 维持长连接 conn.setConnectTimeout(30 * 1000); conn.setReadTimeout(30 * 1000); conn.setRequestMethod("POST"); conn.setDoInput(true); conn.setDoOutput(true); //conn.setRequestProperty("Accept", "application/json, text/javascript, */*; q=0.01"); //conn.setRequestProperty("Content-Type", "application/x-www-form-urlencoded"); //conn.setRequestProperty("Charset", "UTF-8"); conn.setRequestProperty("Content-Length", "" + args.length); OutputStream os = conn.getOutputStream(); os.write(args); if (200 == conn.getResponseCode()) { InputStream in = conn.getInputStream(); InputStreamReader ir = new InputStreamReader(in); BufferedReader br = new BufferedReader(ir); String strLine; StringBuffer buffer = new StringBuffer(); while ((strLine = br.readLine()) != null) { buffer.append(strLine); } br.close(); ir.close(); in.close(); result = buffer.toString(); } os.close(); conn.disconnect(); return result; } } |
数据的封装发送,
|
1 2 3 4 5 6 7 8 9 10 11 12 13 14 15 16 17 18 19 20 21 22 23 24 25 26 27 28 29 30 31 32 33 34 35 36 37 |
import com.google.protobuf.nano.CodedOutputByteBufferNano; private void dopost(){ new AsyncTask<Void, Void, Void>() { @Override protected Void doInBackground(Void... params) { try { Log.e("ard", "服务器返回:" + post()); } catch (IOException e) { e.printStackTrace(); } return null; } }.execute(); } private String post() throws IOException { // 服务器地址 final String url = "http://192.168.31.249:8080/ProtobufDemo/HelloProtobuf"; // 1.定义数据 final Person.SuperPerson sp = new Person.SuperPerson(); sp.setName("小李子"); sp.setId(2222); // 2.转换数据 final byte[] data = new byte[sp.getSerializedSize()]; CodedOutputByteBufferNano output = CodedOutputByteBufferNano.newInstance(data); sp.writeTo(output); // 发送数据 return HttpUtil.post(url, data); } |
2.protobuf-java
proto文件。从上面也看得出,message关键字声明的类名“SuperPerson”是最终java文件里实际使用的内部类,设计这个类、类名很关键。
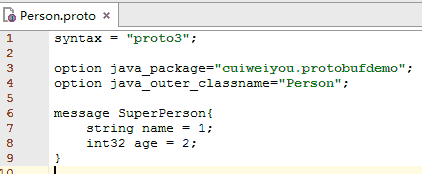
生成java类。

将生成的java文件放入安卓项目和服务端项目中,替换上面的nano版。
安卓中的引用。

服务端解析代码没有变化,注意替换Person文件和jar包即可。
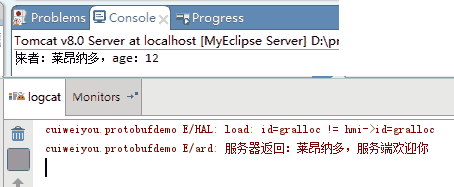
App端代码有变化,数据对象使用Builder进行创建。
|
1 2 3 4 5 6 7 8 9 10 11 12 13 14 15 16 17 18 |
private String post() throws IOException { // 服务器地址 final String url = "http://192.168.31.249:8080/ProtobufDemo/HelloProtobuf"; // 1.定义数据 Person.SuperPerson.Builder b = Person.SuperPerson.newBuilder(); b.setName("莱昂纳多"); b.setAge(12); // 2.转换数据 Person.SuperPerson sp = b.build(); byte[] bytes = sp.toByteArray(); // 发送数据 return HttpUtil.post(url, bytes); } |
可前往此处下载 链接:http://pan.baidu.com/s/1o8O2plw 密码:idby
本文由崔维友 威格灵 cuiweiyou vigiles cuiweiyou 原创,转载请注明出处:http://www.gaohaiyan.com/2134.html
承接App定制、企业web站点、办公系统软件 设计开发,外包项目,毕设


