预备:
Arduino与蓝牙模块参考 http://www.gaohaiyan.com/2525.html
Arduino与LCD模块参考 http://www.gaohaiyan.com/2544.html
本例环境:
Android手机、ArduinoUNO、BT16-A蓝牙模块、LCD1602显示屏,和2个led灯。
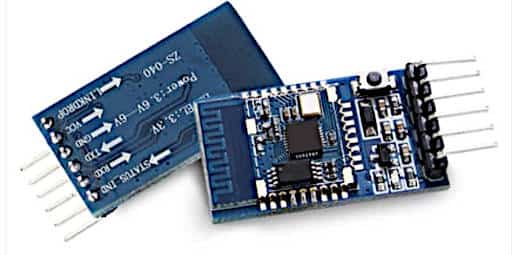
蓝牙模块是4.2版,针脚接法及代码控制和之前的没有区别。
1.图示及操作日志
实物效果图:
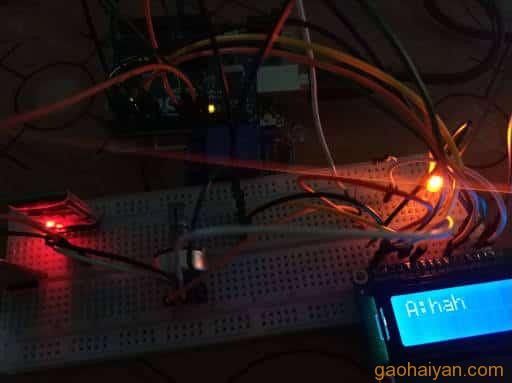
比前两篇记录多的是,Arduino的10针脚、11针脚分别接了黄色LED的正极和红色LED的正极。12和13针脚接在了蓝牙的TX和RX针脚。具体可参照下文代码。
手机上的操作截图:

Arduino串口操作日志:
|
1 2 3 4 5 6 7 8 9 10 |
00:56:39.387 -> Arduino好了 00:56:39.387 -> Bluetooth好了 00:56:39.423 -> LCD屏显示了 00:57:06.268 -> Android回复:hi arduino 00:57:30.569 -> Arduino发出:Hi Android 00:57:46.920 -> Android回复:led1on 00:57:53.241 -> Android回复:led2on 00:58:01.332 -> Android回复:led2off 00:58:08.089 -> Android回复:good 00:58:12.187 -> Arduino发出:hah |
安卓端的日志记录:
|
1 2 3 4 5 6 7 8 9 10 11 12 13 14 15 16 17 18 19 20 21 22 23 24 25 |
00:56:56.942: 开始扫描蓝牙设备 00:56:56.950: 收到设备状态变更信息(1连接,0断开):0 00:56:57.112: 设备name:bt16_4.2,address:48:87:2D:10:EB:72 00:56:59.250: 选择设备:bt16_4.2 48:87:2D:10:EB:72 00:56:59.456: 连接状态改变:0,新状态:2,GATT:265649164 00:56:59.470: 收到设备状态变更信息(1连接,0断开):1 00:56:59.922: 服务开放者状态:0,GATT:265649164,服务数量:1 00:56:59.923: 服务UUID:0000ffe0-0000-1000-8000-00805f9b34fb,其下特征码数量: 2 00:56:59.926: 特征码UUID:0000ffe1-0000-1000-8000-00805f9b34fb,属性:16 00:56:59.926: 描述符UUID:00002902-0000-1000-8000-00805f9b34fb,null 00:56:59.929: 特征码UUID:0000ffe2-0000-1000-8000-00805f9b34fb,属性:4 00:57:05.442: 数据已发送:0 00:57:05.443: 发送完毕,status: 0 00:57:29.924: 收到Arduino信息:Hi Android 00:57:29.930: 收到数据:Hi Android 00:57:46.121: 数据已发送:0 00:57:46.122: 发送完毕,status: 0 00:57:52.403: 数据已发送:0 00:57:52.403: 发送完毕,status: 0 00:58:00.499: 数据已发送:0 00:58:00.500: 发送完毕,status: 0 00:58:07.255: 数据已发送:0 00:58:07.256: 发送完毕,status: 0 00:58:11.540: 收到数据:Haha 00:58:11.542: 收到Arduino信息:hah |
2.安卓控制蓝牙
这里使用的是GATT服务与4.0x的蓝牙通讯,不适用2.0x蓝牙。BT16-A模块只连接中间4个针脚即可,接法同前文HC06。
首先判断硬件是否支持,如果硬件不支持就没有继续的必要。
|
1 2 3 4 5 6 7 8 9 10 |
public boolean isDeviceEnable() { BluetoothManager bluetoothManager = context.getSystemService(Context.BLUETOOTH_SERVICE); BluetoothAdapter bluetoothAdapter = bluetoothManager.getAdapter(); if (bluetoothAdapter == null) { return false; } return true; } |
然后判断蓝牙是否开启。
|
1 2 3 4 5 6 |
public boolean isBluetoothEnable() { if (!bluetoothAdapter.isEnabled() || BluetoothAdapter.STATE_OFF == bluetoothAdapter.getState()) { return false; } return true; } |
如果没有开启,则前往相关页面手动开启。
|
1 2 |
Intent enableBluetoothIntent = new Intent(BluetoothAdapter.ACTION_REQUEST_ENABLE); startActivityForResult(enableBluetoothIntent, CODE_REQUEST_BLUETOOTH); |
之后还要获取操作结果。
|
1 2 3 4 5 6 7 8 9 |
@Override protected void onActivityResult(int requestCode, int resultCode, Intent data) { super.onActivityResult(requestCode, resultCode, data); if (requestCode == CODE_REQUEST_BLUETOOTH) { if (isBluetoothEnable()) { startScanLeDevices(); // 前往扫描 } } } |
开启后就可以进行扫描了。
|
1 2 3 4 5 |
public void startScanLeDevices() { Log.e("ard", "开始扫描蓝牙设备"); BluetoothLeScanner bluetoothLeScanner = bluetoothAdapter.getBluetoothLeScanner(); bluetoothLeScanner.startScan(scanCallback); // 扫描回调 } |
扫描回调中定义了3个关键方法。
|
1 2 3 4 5 6 7 8 9 10 11 12 13 14 15 16 17 18 19 20 |
private ScanCallback scanCallback = new ScanCallback() { @Override public void onScanResult(int callbackType, ScanResult result) { if (null != result) { BluetoothDevice device = result.getDevice(); String name = device.getName(); String address = device.getAddress(); Log.e("ard", "设备name:" + name + ",address:" + address); // 这里可以对目标蓝牙模块进行筛选 } } public void onBatchScanResults(List<ScanResult> results) { Log.e("ard", "onBatchScanResults:" + results.size()); } public void onScanFailed(int errorCode) { Log.e("ard", "onScanFailed errorCode:" + errorCode); } }; |
找到目标蓝牙模块后就可以进行连接了。此时并不需要手机系统里的“配对”,同时 本例用的硬件配对也总是失败,提示PIN码或密码错误,不知道是不是个例,没有更多设备进行验证。
|
1 2 3 4 5 6 7 8 9 10 11 |
public void connectDevice(ScanResult model) { this.targetDevice = model; // 定义为全局目标蓝牙模块 final BluetoothDevice device = model.getDevice(); String name = device.getName(); String address = device.getAddress(); Log.e("ard", "选择设备:" + name + " " + address); device.connectGatt(context, true, gattCallback); // 连接这台蓝牙设备。指定了连接成功后的GATT服务回调。 } |
GATT服务回调实时监听与蓝牙模块的连接状态、读写状态,以及服务信息获取。
|
1 2 3 4 5 6 7 8 9 10 11 12 13 14 15 16 17 18 19 20 21 22 23 24 25 26 27 28 29 30 31 32 33 34 35 36 37 38 39 40 41 42 43 44 45 46 47 48 49 50 51 52 53 54 55 56 57 58 59 60 61 62 63 64 65 66 67 68 69 70 71 72 73 74 75 76 77 78 79 80 81 82 83 84 85 86 87 88 89 90 91 92 93 94 |
// 安卓与蓝牙连接成功后回调此GATT对象 private BluetoothGattCallback gattCallback = new BluetoothGattCallback() { /** * BluetoothGattCallback中的方法。获取和蓝牙设备的连接状态 * @param gatt 返回连接建立的gatt对象 * @param status 返回的是此次gatt操作的结果,成功了返回0 * @param newState 每次client连接或断开连接状态变化 */ @Override public void onConnectionStateChange(BluetoothGatt gatt, int status, int newState) { Log.e("ard", "连接状态改变:" + status + ",新状态:" + newState + ",GATT:" + gatt.hashCode()); if (status == BluetoothGatt.GATT_SUCCESS && newState == BluetoothGatt.STATE_CONNECTED) { // 0-gatt连接成功 currentBluetoothGatt = gatt; // 定义为全局蓝牙通讯接口 bluetoothLeScanner.stopScan(scanCallback); // 停止扫描 } else { // 失败或断开。这个状态的回调比较慢 Log.e("ard", "连接状态改变:失败或断开"); } } /** * BluetoothGattCallback中的方法。获取蓝牙设备开放的服务 * 当执行 currentBluetoothGatt.discoverServices(); 后才可以获取到蓝牙设备的服务 * @param gatt 返回的是本次连接的gatt对象,即currentBluetoothGatt * @param status */ @Override public void onServicesDiscovered(BluetoothGatt gatt, int status) { List<BluetoothGattService> gattServiceList = gatt.getServices(); Log.e("ard", "蓝牙模块服务开放状态:" + status + ",GATT:" + gatt.hashCode() + ",服务数量:" + gattServiceList.size()); // 遍历Service for (int i = 0; i < gattServiceList.size(); i++) { BluetoothGattService gattService = gattServiceList.get(i); String serviceUUID = gattService.getUuid().toString(); List<BluetoothGattCharacteristic> characteristicList = gattService.getCharacteristics(); Log.e("ard", "服务UUID:" + serviceUUID + ",其下特征码数量: " + (null == characteristicList ? 0 : characteristicList.size())); // 遍历Characteristic for (int j = 0; j < characteristicList.size(); j++) { BluetoothGattCharacteristic characteristic = characteristicList.get(j); currentBluetoothGatt.setCharacteristicNotification(characteristic, true); // 设置可接收回调消息 String characteristicUUID = characteristic.getUuid().toString(); int properties = characteristic.getProperties(); Log.e("ard", "\t特征码UUID:" + characteristicUUID + ",属性:" + properties); // 这个特征码是手机向蓝牙发数据的。根据蓝牙模块型号不同特征码uuid也不同,可以都尝试一下 if (characteristicUUID.startsWith("0000ffe2")) { bluetoothHandlerCharacteristic = characteristic; // 设为全局的目标蓝牙模块写数据的控制器 } // --- 以下if块没有实质操作 --- if ((properties | BluetoothGattCharacteristic.PROPERTY_NOTIFY) > 0) { // Characteristic可以接收回调消息 List<BluetoothGattDescriptor> descriptorList = characteristic.getDescriptors(); if (null != descriptorList && descriptorList.size() > 0) { // 遍历Descriptor for (int k = 0; k < descriptorList.size(); k++) { BluetoothGattDescriptor descriptor = descriptorList.get(k); UUID descriptorUUID = descriptor.getUuid(); byte[] descriptorValue = descriptor.getValue(); Log.e("ard", "\t\t描述符UUID:" + descriptorUUID + "," + String.valueOf(descriptorValue)); } } } } } } /** * Arduino向蓝牙串口写输入后自动响应 * * @param gatt * @param characteristic */ @Override public void onCharacteristicChanged(BluetoothGatt gatt, BluetoothGattCharacteristic characteristic) { byte[] data = characteristic.getValue(); String msg = StringUtil.getChars(data); // Arduino通过蓝牙发过来的是ASCII码,转为字符串 Log.e("ard", "通过蓝牙收到Arduino的数据:" + msg); } /** * 手机向蓝牙write操作后回调 * * @param gatt * @param characteristic * @param status */ @Override public void onCharacteristicWrite(BluetoothGatt gatt, BluetoothGattCharacteristic characteristic, int status) { Log.e("ard", "通过蓝牙向Arduino发送了数据:" + status); } }; |
执行 device.connectGatt 后就须要扫描目标蓝牙开放的服务了,以响应 BluetoothGattCallback 的 onServicesDiscovered 方法,打开蓝牙模块中服务的通知回调。
|
1 2 3 4 5 |
public void getGattDeviceServices() { if (null != currentBluetoothGatt) { currentBluetoothGatt.discoverServices(); // 扫描开放的服务。回调BluetoothGattCallback对象的onServicesDiscovered方法 } } |
最后要做的就是向蓝牙发消息。而Arduino是实时通过串口与蓝牙模块交互的,因此可以直接获取蓝牙收到的消息。
|
1 2 3 4 |
public void sendMsgToBlueTooth(String msg) { bluetoothHandlerCharacteristic.setValue(msg); // 特定的 特征码,用于向蓝牙发消息 currentBluetoothGatt.writeCharacteristic(bluetoothHandlerCharacteristic); // 回调BluetoothGattCallback的onCharacteristicWrite方法 } |
必要时还应该关闭与蓝牙的连接。
|
1 2 3 4 5 6 7 |
if (null != currentBluetoothGatt) { currentBluetoothGatt.disconnect(); currentBluetoothGatt.close(); } currentBluetoothGatt = null; targetDevice = null; |
另外就是和UI相关的代码,详细内容可通过文末的连接下载整个项目查看。
3.Arduino控制蓝牙
控制硬件的代码比较简单,看注释即可。
|
1 2 3 4 5 6 7 8 9 10 11 12 13 14 15 16 17 18 19 20 21 22 23 24 25 26 27 28 29 30 31 32 33 34 35 36 37 38 39 40 41 42 43 44 45 46 47 48 49 50 51 52 53 54 55 56 57 58 59 60 61 62 63 64 65 66 67 68 69 70 71 72 73 74 75 |
#include <SoftwareSerial.h> SoftwareSerial BT(12, 13); // 蓝牙模块控制器。第一个pin接模块的TX脚,第二个接蓝牙的RX脚 String string = ""; LiquidCrystal LCD(7, 6, 5, 4, 3, 2); int yellowLedPin = 10; // 黄色led控制针脚,响应led1xx指令 int redLedPin = 11; // 红色led控制针脚,响应led2xx指令 String led1on = "led1on"; // 黄色led点亮指令 String led1off = "led1off"; // 黄色led熄灭指令 String led2on = "led2on"; String led2off = "led2off"; void setup() { pinMode( yellowLedPin, OUTPUT); pinMode( redLedPin, OUTPUT); Serial.begin(9600); Serial.println("Arduino好了"); BT.begin(9600); Serial.println("Bluetooth好了"); LCD.begin(16, 2); LCD.clear(); LCD.print("Bluetooth + LCD"); Serial.println("LCD屏显示了"); } void loop() { string = ""; if (Serial.available()) { while (Serial.available()) { char data = Serial.read(); delay(3); BT.write(data); delay(3); string += data; } Serial.println("Arduino发出:" + string); LCD.clear(); LCD.print("A:" + string); } string = ""; if (BT.available()) { while (BT.available()) { char data = BT.read(); delay(3); string += data; } Serial.println("Android回复:" + string); if (led1on.equals(string)) { // 判断安卓手机发来的指令 digitalWrite(yellowLedPin, HIGH); } else if (led1off.equals(string)) { digitalWrite(yellowLedPin, LOW); } if (led2on.equals(string)) { digitalWrite(redLedPin, HIGH); } else if (led2off.equals(string)) { digitalWrite(redLedPin, LOW); } LCD.clear(); LCD.print("Z:" + string); } } |
安卓端项目代码,https://gitee.com/vigiles/AndroidAndBluetoothAndArduino 。
-end
本文由崔维友 威格灵 cuiweiyou vigiles cuiweiyou 原创,转载请注明出处:http://www.gaohaiyan.com/2554.html
承接App定制、企业web站点、办公系统软件 设计开发,外包项目,毕设


